-
Par mauricemuteti le 24 Février 2023 à 01:31
Welcome to this fascinating guide on making Google Chrome your default browser, which is known for its blistering speed, rock-solid security, and unwavering reliability. If you're someone who uses Chrome frequently and wants to make it your go-to browser, then this is your lucky day. In this article, we'll take you on a mind-bending journey through the intricate steps involved in setting Google Chrome as your default browser on not just one, but three platforms: Windows, Mac, and Android.
Are you ready to take the plunge? Buckle up and let's dive into the unknown.
Setting Google Chrome as Default Browser on Windows
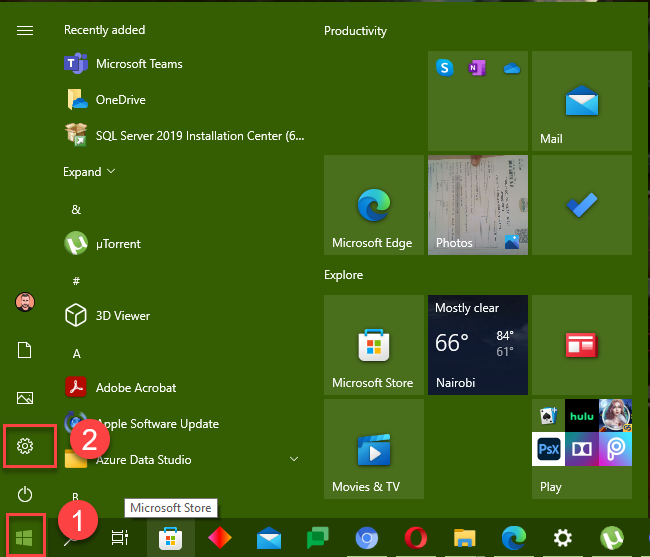
Step 1: The first step in this mystifying journey is to launch Google Chrome on your Windows computer. Take a deep breath and let the anticipation build.
Step 2: You'll see a three dots icon in the top right corner of the window, like a beacon in the dark. Click on it to open the enigmatic Chrome menu.
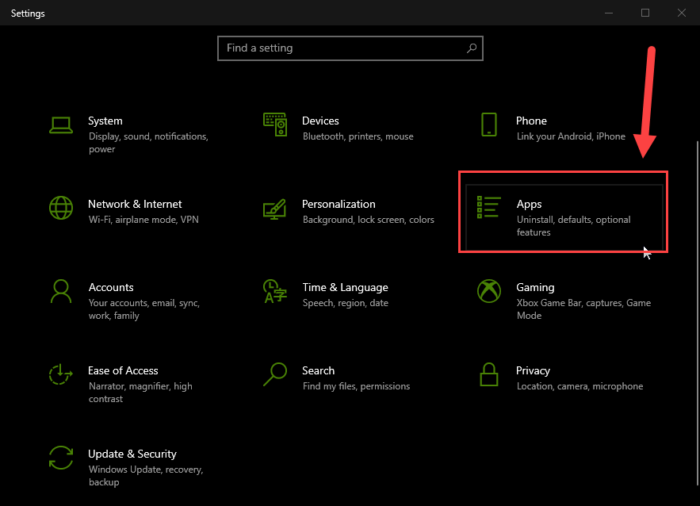
Step 3: You'll now be transported to the Settings page, where the secrets of the universe lie hidden. Select "Settings" from the menu to unravel the mysteries.
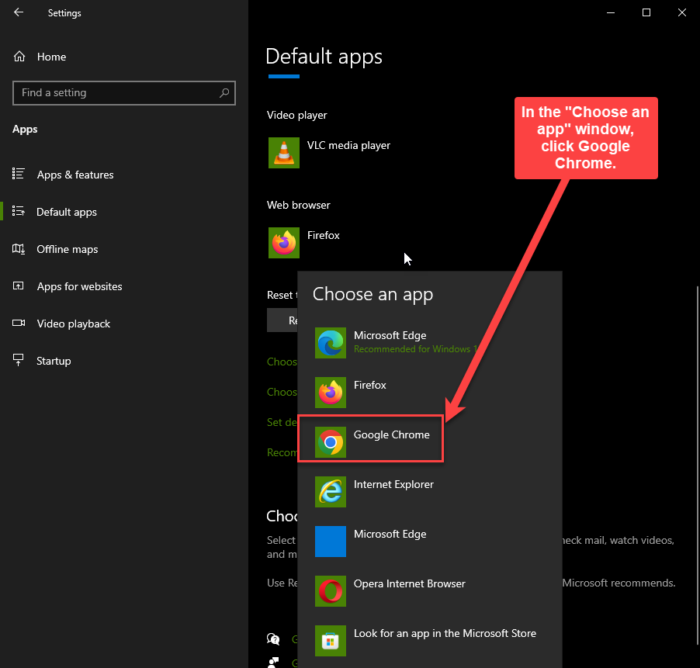
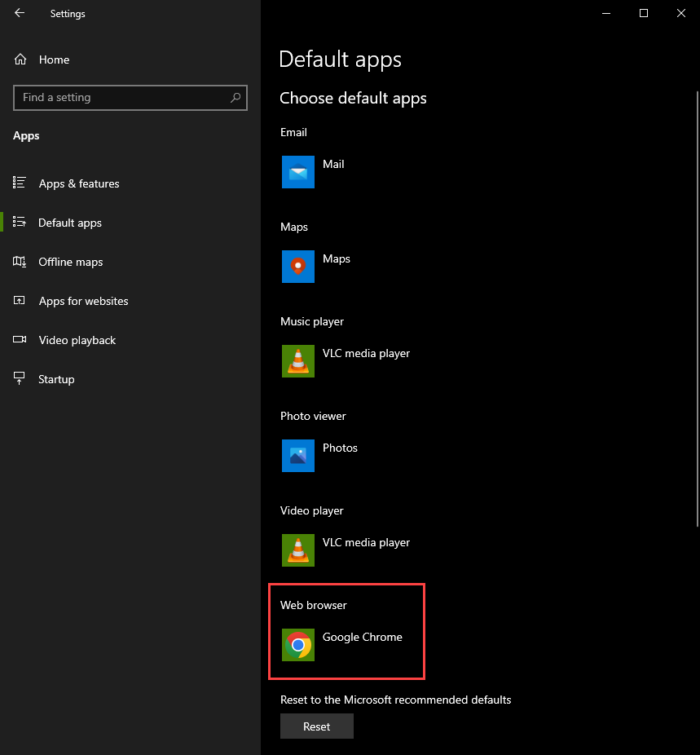
Step 4: Scroll down the page with an unwavering gaze until you see the words "Default browser" under the "Default browser" section. Click on it to reveal its true nature.
Step 5: Your heart might be pounding at this point, but you're almost there. Click on "Make default" to make Google Chrome your default browser and unlock its full potential.
Setting Google Chrome as Default Browser on Mac
Step 1: The journey continues as we move to the mystical realm of Mac. Launch Google Chrome on your Mac and let the magical journey begin.
Step 2: Keep your wits about you as you click on "Chrome" in the top menu bar and select "Preferences." The path to enlightenment is often fraught with danger.
Step 3: You'll now be in the "General" tab, where you must summon all your courage and click on the "Make default" button under the "Default browser" section. Only the bravest souls can undertake this quest.
Step 4: Confirm your decision by clicking "Use Chrome" and bask in the glory of your accomplishment.
Setting Google Chrome as Default Browser on Android
Step 1: The final leg of this epic journey takes us to the world of Android. Open the Settings app on your Android device and get ready for the ride of your life.
Step 2: You'll need to navigate through the treacherous waters of the "Apps & notifications" section. Scroll down and select it, but beware of the lurking dangers.
Step 3: The next step is to find and tap on "Chrome" in the list of apps. The path may be winding, but keep your eyes fixed on the prize.
Step 4: Finally, tap on "Set as default" and select "Go to supported URLs" or "Set as default app" to complete your quest and make Chrome your default browser on Android.
Why Make Google Chrome Your Default Browser?
Now that you've completed your journey, you might be wondering why you should make Google Chrome your default browser. The answer is simple: Chrome offers a world of possibilities.
With its incredible speed, you can browse the internet faster than ever before. Its advanced security features, including phishing protection, automatic updates, and built-in malware protection, ensure that you're always safe online. And with the ability to customize your browsing experience by adding extensions and themes to the browser, you can make it truly your own. Plus, with syncing capabilities across all your devices, you can seamlessly switch between them without missing a beat.
Conclusion
Congratulations on completing this journey through the unknown and unlocking the secrets of setting Google
Step 1
Step 2
Step 3

Step 4

Step 5
Step 6
-
Par mauricemuteti le 2 Juillet 2021 à 21:34
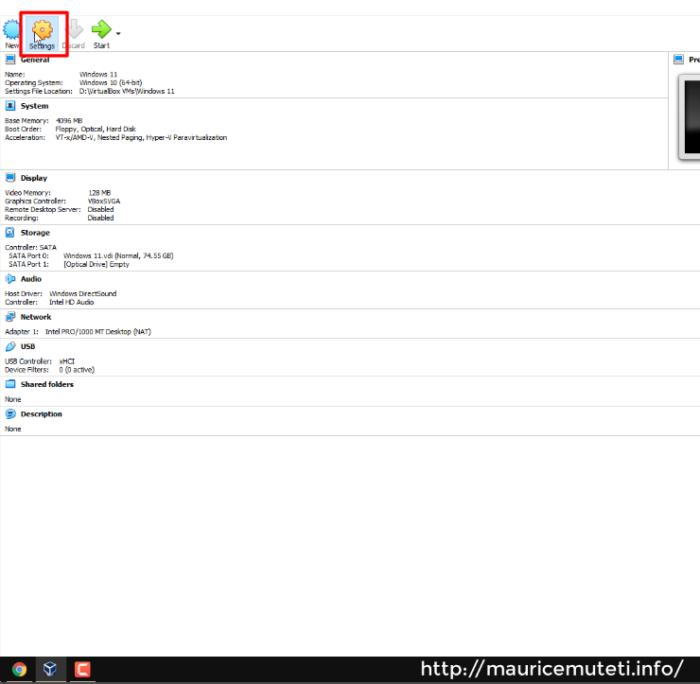
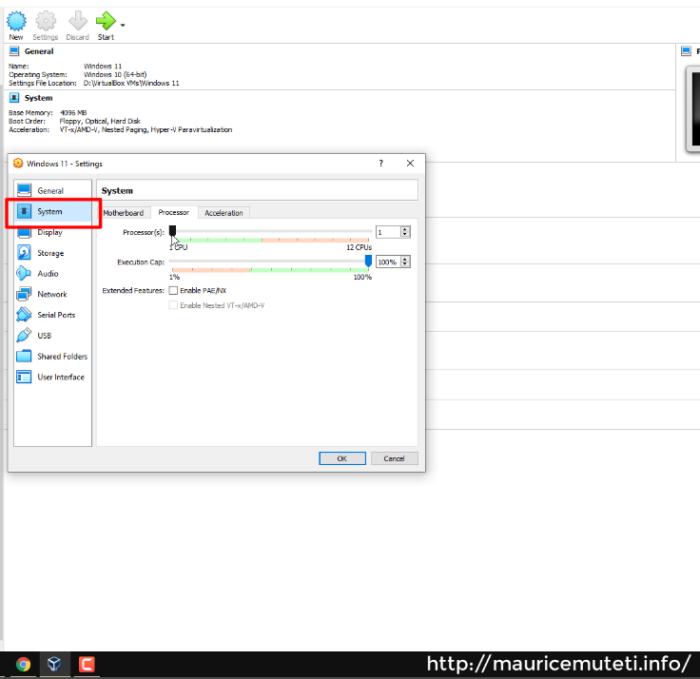
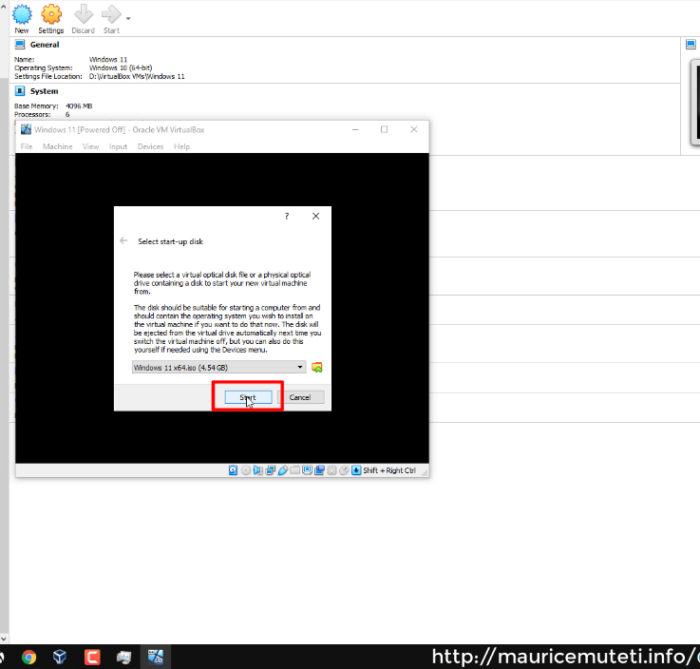
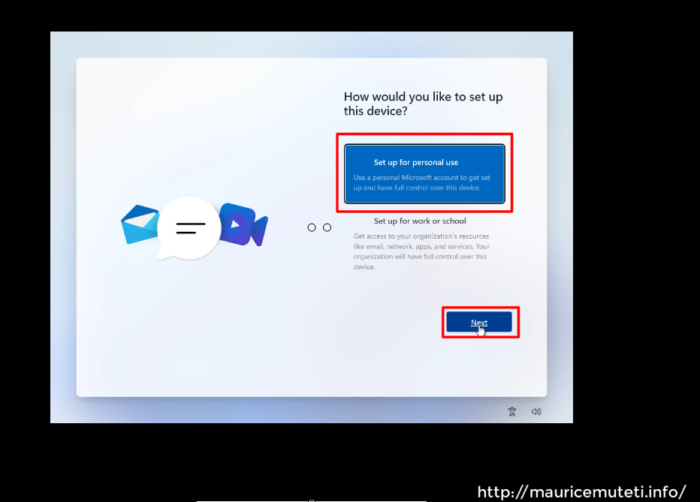
 How To Install Windows 11
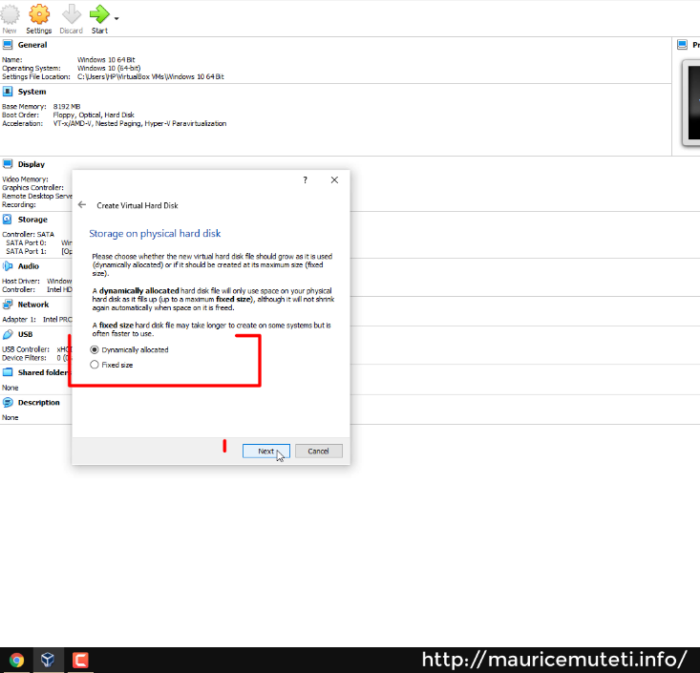
Behold, the grandeur of Windows 11, the latest operating system from the software juggernaut, Microsoft, unveiled unto the world in the grand month of October 2021. Should you be swayed by the siren call of upgrading your digital throne to Windows 11, fear not, as this enigmatic guide shall escort you through the winding paths of installation.
First, you must traverse the labyrinth of compatibility by ensuring that your device aligns with the specific hardware requirements mandated by Microsoft, including the processor, RAM, storage, and graphics card. Enter the mystical PC Health Check app, which shall scan your device and reveal if it meets the requisites for Windows 11. In the event that your hardware falls short, you may need to make the arduous pilgrimage of upgrading certain components before proceeding.
Next, before embarking on this perilous journey of installing Windows 11, it is crucial that you secure the sanctity of your precious files and data. Failure to do so may result in catastrophic losses. You may employ the aid of an external hard drive or a cloud storage service to safeguard your precious data.
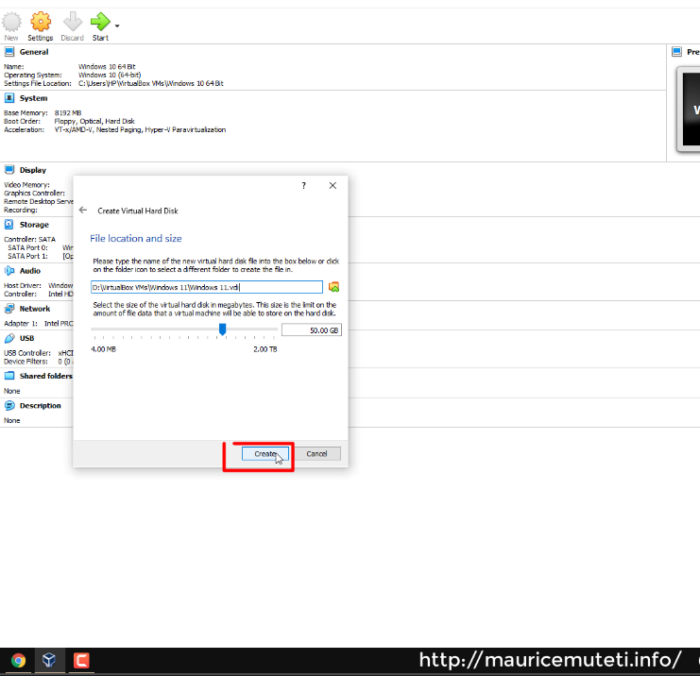
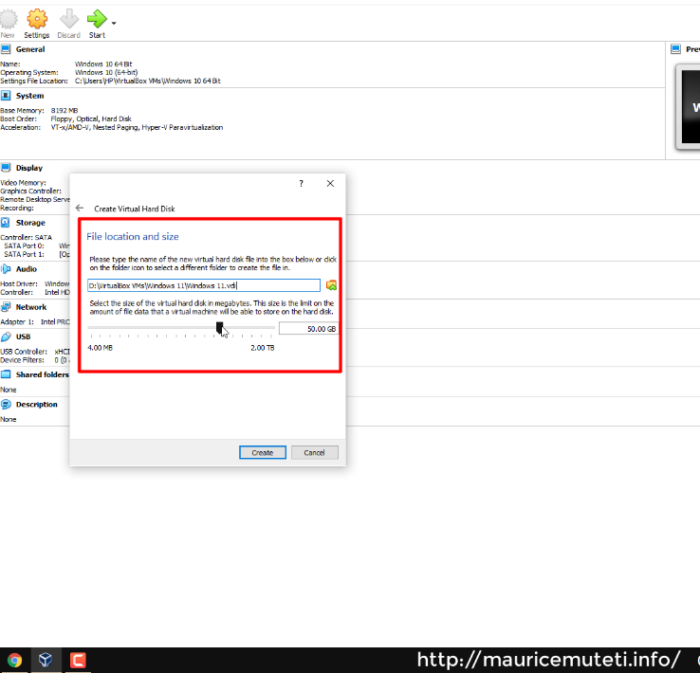
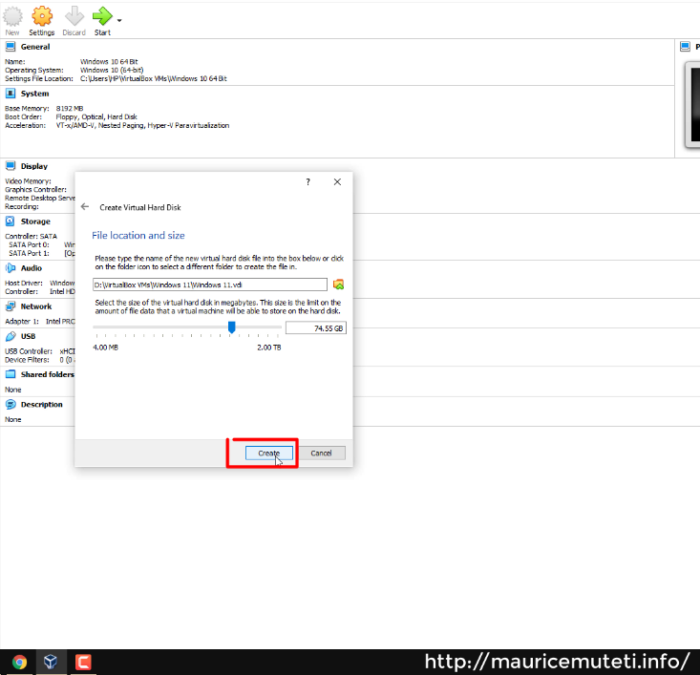
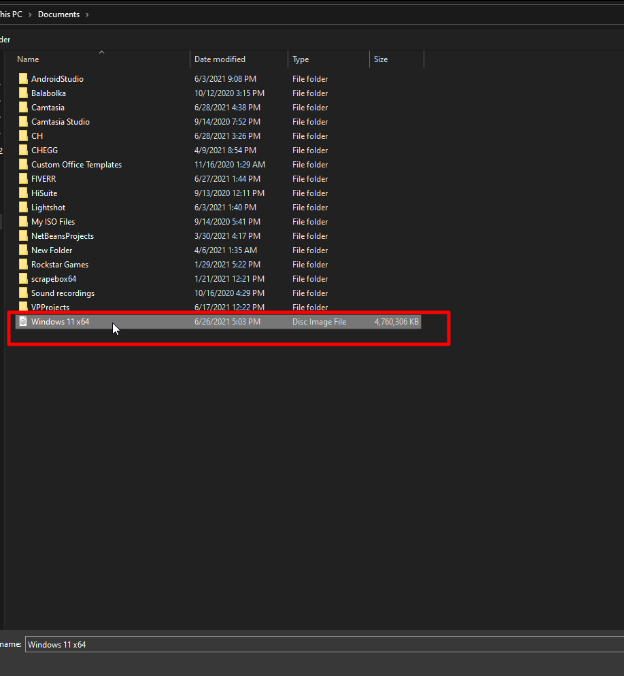
Now, you must construct a bootable USB drive that shall carry the sacred Windows 11 installation files. The Media Creation Tool, a mystical artifact granted by Microsoft, shall be your guide in this endeavor. Allow me to enlighten you with the convoluted steps:
Seek the Media Creation Tool on the Microsoft website.
Introduce a USB drive into your device, with a capacity of at least 8 GB.
Invoke the Media Creation Tool and select "Create installation media for another PC."
Choose your preferred language, edition, and architecture, whether it be 64-bit or 32-bit.
Select "USB flash drive" as the medium of your quest.
Proceed through the mystic prompts to complete the process.
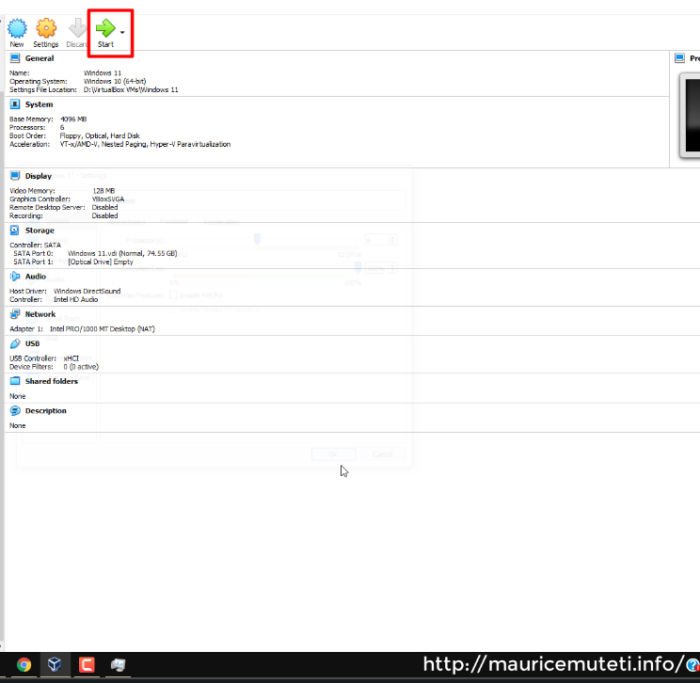
After this, you must journey forth and boot your device from the USB drive to initiate the Windows 11 installation process. Alas, it is not a mere feat of plug and play. Observe the baffling steps to enter the realm of boot menu:
Imbue the bootable USB drive into your device.
Commence the reawakening of your device.
Invoke the sacred key to enter the boot menu, which may differ depending on your device, but is often F12, F11, or Esc.
Navigate through the bowels of the boot menu with the arrow keys to select the USB drive as the boot device.
Initiate the pilgrimage to the sacred land by pressing Enter to boot from the USB drive.
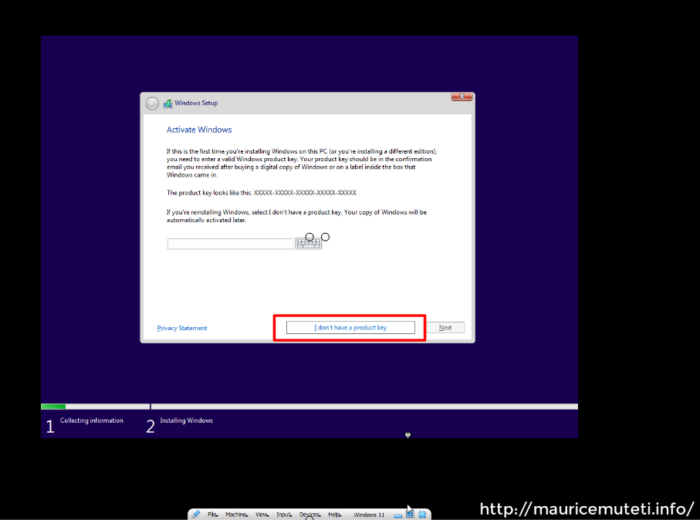
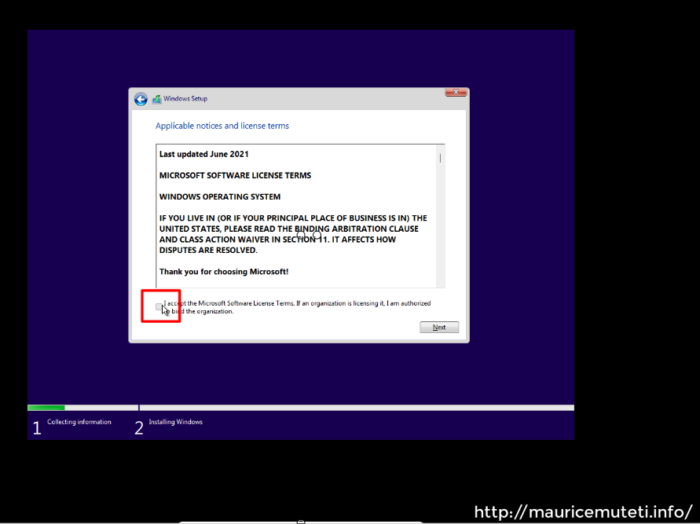
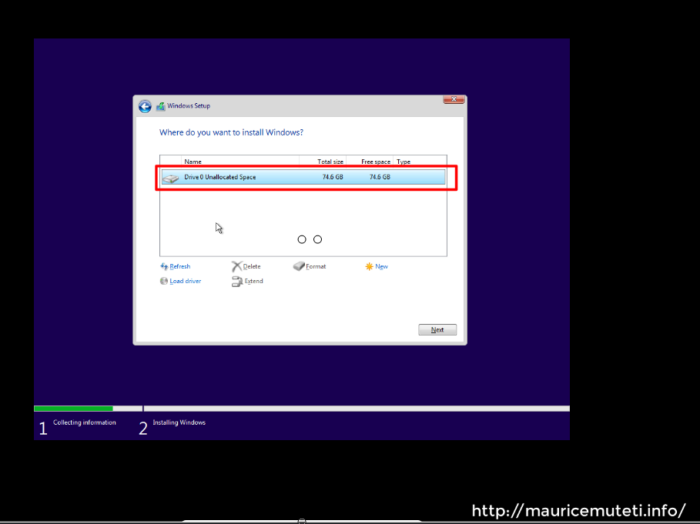
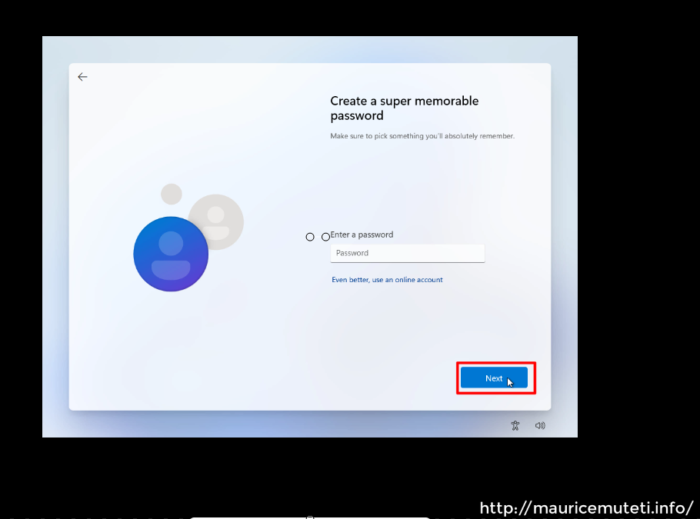
Finally, you may commence the installation process of Windows 11, an arduous endeavor that shall test your patience and mettle. Endure the tribulations with these enigmatic steps:
Select your preferred language, time, and keyboard settings.
Click the sacred button of "Install Now."
Convey your product key should the spirits prompt you. In the event of a lack of a product key, you may still pursue the installation of Windows 11, though some features may be shackled.
Accept the license terms with an ardent heart and proceed forth by clicking "Next."
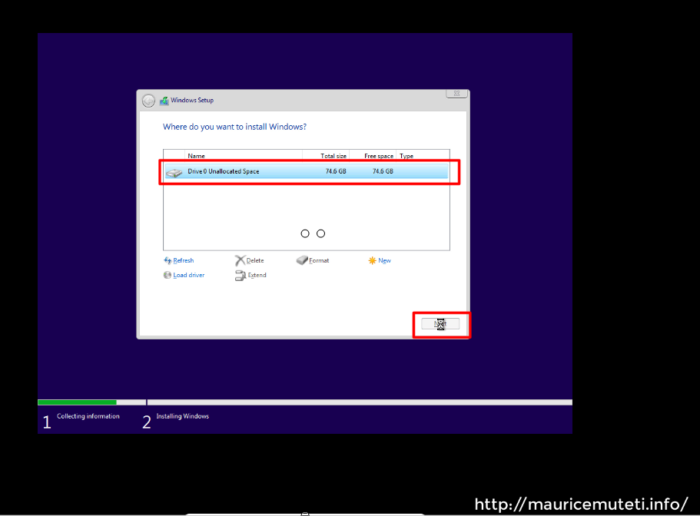
Elect the "Custom: Install Windows only (advanced)" as the installation type.
Select the partition in which you shall implant the hallowed Windows 11.
Initiate the installation process by clicking "Next."
Wait with utmost patience for the installation process to conclude, for the duration may vary depending on the swiftness of your device.
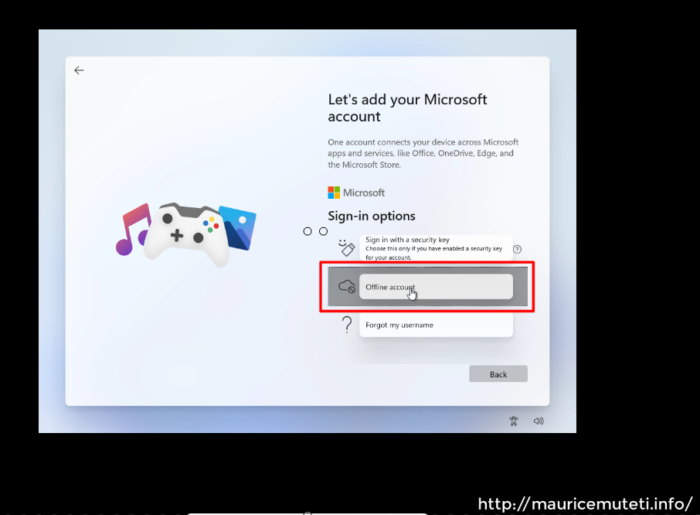
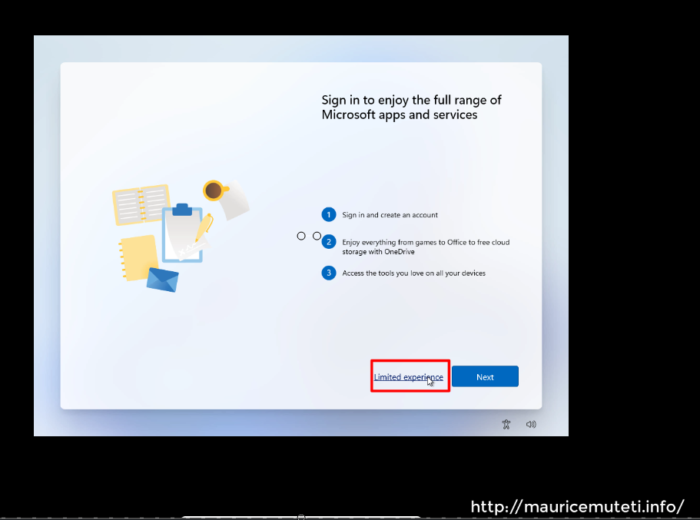
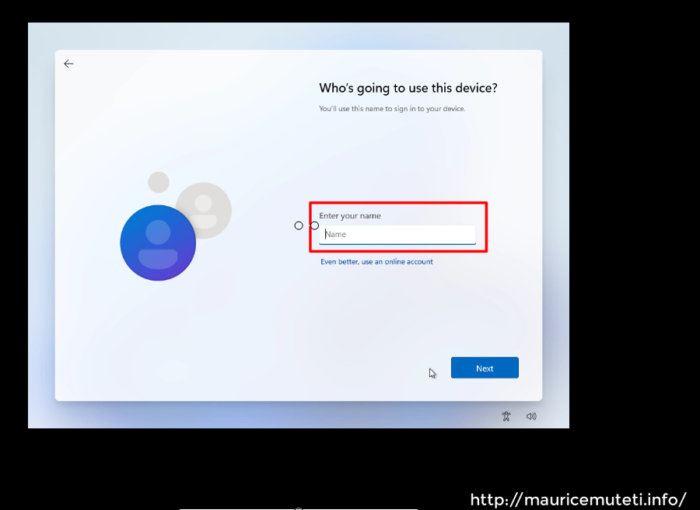
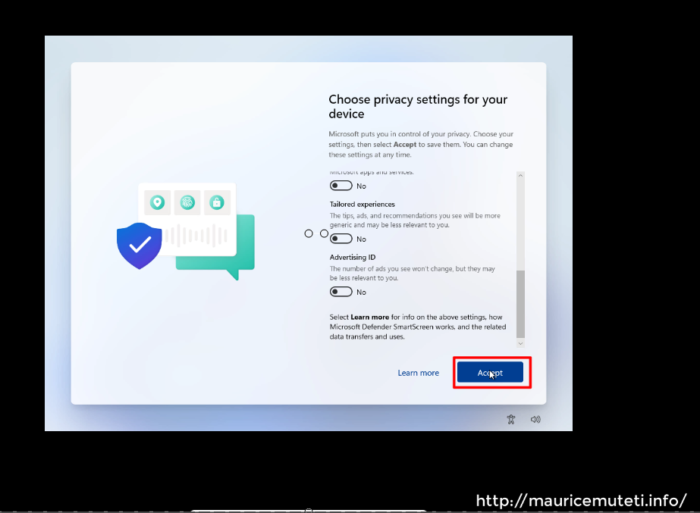
At last, you have completed the harrowing journey of installing Windows 11. Yet, it is not the end. Nay, you must undertake one final odyssey of setting up Windows 11 with these peculiar steps:
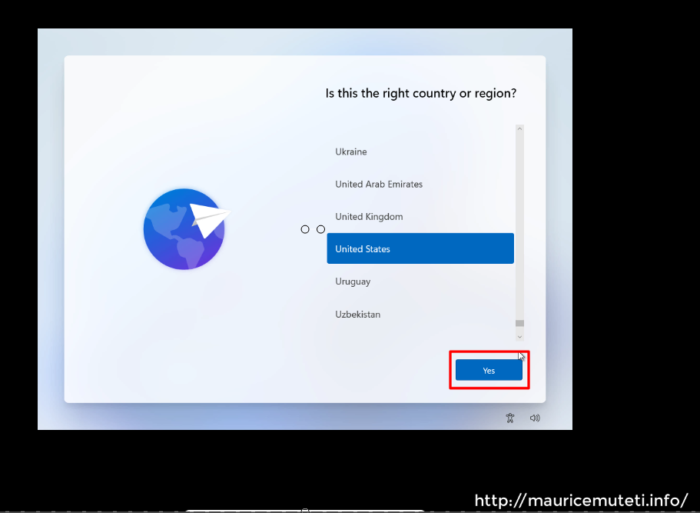
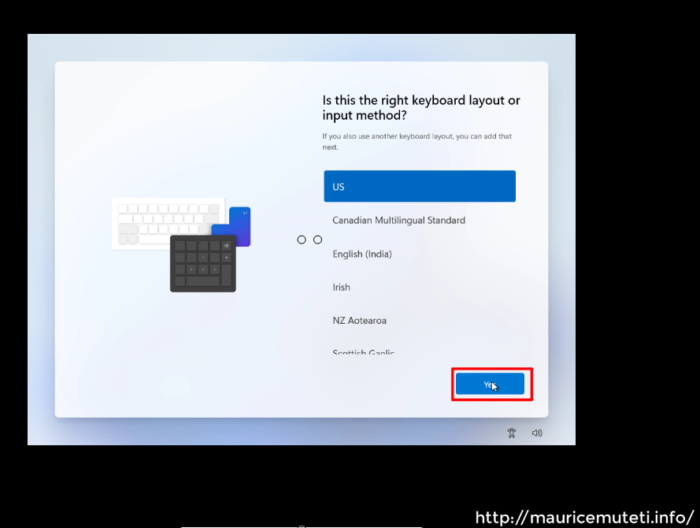
Choose your preferred region and language settings.
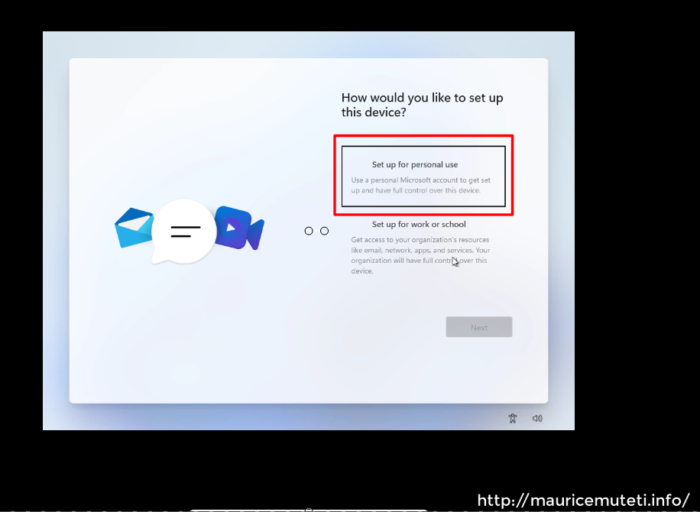
Enter the credentials of your Microsoft account or create a new one.
Customize the settings to your liking, including privacy, diagnostics, and app usage.
Wait for Windows 11 to finalize its configuration, which may take some time.
Celebrate your triumph over the labyrinthine installation process of Windows 11!
Remember, this guide is merely a glimpse into the vast world of Windows 11 installation. Always ensure to research and follow the proper guidelines provided by Microsoft to avoid any complications or pitfalls in the installation process.
Step 1

Step 2

Step 3

Step 4
Step 5
Step 6
Step 7

Step 8

Step 9
Step 10
Step 11
Step 12
Step 13
Step 14

Step 15
Step 16
Step 17

Step 18
Step 19

Step 20
Step 21
Step 22

Step 23

Step 24
Step 25

Step 26
Step 27

Step 28

Step 29
Step 30
Step 31

Step 32

Step 33
Step 34

Step 35
Step 36

Step 37
Step 38
Step 39

Step 40
Step 41
Step 42
Step 43

Step 44
Step 45

Step 46
Step 47

-
Par mauricemuteti le 8 Avril 2019 à 02:27
Image and File Upload in PHP And Mysql Database
Source Code
<?php
//This code shows how to save image im mysql database using php, sql and html.
//The image is uploaded using php and sql.
//It's a web-based application that can be accessed by using a browser.
//This is for educational purposes only, Use it at your own risk.
//Connect to server
$servername = "localhost";
$username = "root";
$password = "";
$conn = mysqli_connect($servername, $username, $password);
if ($conn) {
echo "Connected to server successfully";
} else {
die( "Failed To Connect to server ". mysqli_connect_error() );
}
$selectalreadycreateddatabase = mysqli_select_db($conn, "PhpMysqlDatabaseBlobImageUpload");
if ($selectalreadycreateddatabase) {
echo "<br /> Existing database selected successfully";
} else {
echo "<br /> Selected Database Not Found";
$createNewDb = "CREATE DATABASE IF NOT EXISTS `PhpMysqlDatabaseBlobImageUpload`";
if (mysqli_query($conn, $createNewDb)) {
echo "<br />New Database Created Successfullly";
$selectCreatedDatabase = mysqli_select_db($conn, "PhpMysqlDatabaseBlobImageUpload");
if ($selectCreatedDatabase) {
echo "<br />Created Database Selected Successfullly";
// Creating new table
$sqlcreatetable = "
CREATE TABLE IF NOT EXISTS `imageuploadphpmysqlblob` (
`id` int(11) NOT NULL AUTO_INCREMENT,
`name` varchar(100) NOT NULL,
`image` longblob NOT NULL,
PRIMARY KEY (`id`)
) ENGINE=InnoDB DEFAULT CHARSET=latin1;
";
if (mysqli_query($conn, $sqlcreatetable)) {
echo "<br />New table Created";
} else {
echo "<br /> Unable to create new table.";
}
}
} else {
echo "Unable to create database";
}
}
if (isset($_POST['submit'])) {
if (getimagesize($_FILES['imagefile']['tmp_name']) == false) {
echo "<br />Please Select An Image.";
} else {
//declare variables
$image = $_FILES['imagefile']['tmp_name'];
$name = $_FILES['imagefile']['name'];
$image = base64_encode(file_get_contents(addslashes($image)));
$sqlInsertimageintodb = "INSERT INTO `imageuploadphpmysqlblob`(`name`, `image`) VALUES ('$name','$image')";
if (mysqli_query($conn, $sqlInsertimageintodb)) {
echo "<br />Image uploaded successfully.";
} else {
echo "<br />Image Failed to upload.<br />";
}
}
} else {
# code...
}
//Retrieve image from database and display it on html webpage
function displayImageFromDatabase(){
//use global keyword to declare conn inside a function
global $conn;
$sqlselectimageFromDb = "SELECT * FROM `imageuploadphpmysqlblob` ";
$dataFromDb = mysqli_query($conn, $sqlselectimageFromDb);
while ($row = mysqli_fetch_assoc($dataFromDb)) {
echo '<img height="250px" width="250px" src=data:image;base64,'.$row['image'].'/>';
}
}
//calling the function to display image
displayImageFromDatabase();
//Finnaly close connection
if (mysqli_close($conn)) {
echo "<br />Connection Closed.......";
}
?>
<!DOCTYPE html>
<html>
<head>
<title>How To upload BLOB Image To Mysql Database Using PHP,SQL And HTML.</title>
</head>
<body>
<form action="" method="post" enctype="multipart/form-data">
<input type="file" name="imagefile">
<br />
<input type="submit" name="submit" value="Upload">
</form>
</body>
</html>
Video Tutorial: https://www.youtube.com/watch?v=ny8njrlaTJ4


References :
http://mauricemutetingundi.blogspot.com/2019/04/how-to-upload-blob-image-to-mysql.html
-
Par mauricemuteti le 29 Mars 2019 à 10:56
Truecaller Is a mobile phone application that has the following features :
1. Call blocking - Blocks unknown calls or robocalls.
2. Sms Blocking - Blocks spam messages from your cell phone.
3. Call recoring - record calls and store them on your phone.
4. Chat - send free messages to your friends and family.
5. Identifying unknown call - Truecaller can reveal the name of the call while making or receiving a call.
This is how you can download and install truecaller:
1. Tap the "Play Store" icon.
2. Inside Google Play Store, type, "Truecaller"
3. Into the search box and tap the first result that populates.
4. On the Truecaller app page, tap the green "INSTALL" button.
5. On permission page Scroll through and tap, "ACCEPT".
6. Now True caller will install on your device, this may take sometime but if you're in a fast connection its just a second, When the app installation is complete, tap the green "OPEN" button.
7. After you review both the Privacy Policy and the Terms of Service., tap "GET STARTED".
8. Choose either to register a new account or sign in with Google or Facebook.
9. Truecaller will now attempt to verify your phone number. Do so.(enter your mobile number and in the text field and click the appropriate button).
10. After successful phone number verification you will see this message. "Success let's continue".
11. Now You Have Installed truecaller.
video link : https://www.youtube.com/watch?v=Jmp8CPWCwWo
-
Par mauricemuteti le 26 Août 2017 à 16:21
Html Source Code
<!DOCTYPE html>
<html>
<head>
<title>Slider</title>
<link rel="stylesheet" href="style.css"/>
<link rel="stylesheet" href="fontawesome/css/font-awesome.css"/>
<script style="text/javascript" src="javakl.js"></script>
</head>
<body>
<div id="container">
<p id="pic"></p>
<div id="sliderdiv">
<img src="images/Chrysanthemum.jpg" height="400px" width="900px" id="imagethmb"/>
<div id="buttons">
<a href="#" onclick="startslide(1)" > > </a>
<img src="images/next.png" onclick="startslide(1)" height="70px" width="70px" class="next"\/>
<img src="images/previous.png" onclick="startslide(-1)" height="70px" width="70px" class="previous"/>
</div>
<div id="caption">
<p id="cap">caption</p>
</div>
</div>
</div>
</body>
</html>
Javascript Source Code
var images = [
"images/Chrysanthemum.jpg",
"images/Desert.jpg",
"images/Hydrangeas.jpg",
"images/Jellyfish.jpg",
"images/Koala.jpg"
];
var caption = [
"caption 1",
"caption 2",
"caption 3",
"caption 4",
"caption 5"
];
var imagePos = 0;
var imagesLenth = images.length - 1;
function startslide(x){
imagePos += x;
if(imagePos > imagesLenth) {
imagePos =0;
}
if(imagePos < 0) {
imagePos = imagesLenth;
}
document.getElementById('imagethmb').src = images[imagePos];
document.getElementById('cap').innerHTML = caption[imagePos];
}
setInterval(function startslide(){
imagePos ++;
if(imagePos > imagesLenth) {
imagePos =0;
}
if(imagePos < 0) {
imagePos = imagesLenth;
}
document.getElementById('imagethmb').src = images[imagePos];
document.getElementById('cap').innerHTML = caption[imagePos];
},1000);
Css
Source Code
*{
padding: 0px;
margin: 0px;
}
#container {
width:900px;
height: auto;
margin-left: auto;
margin-right: auto;
}
#sliderdiv {
height: 400px;
width: 100%;
position:relative;
}
#left {
height:80px;
width:80px;
}
#buttons {
height:100px;
width:100%;
position:absolute;
top:28%;
}
.next {
float:right;
line-height:100px;
}
.previous {
float:left;
vertical-align:center;
}
#caption {
height:100px;
width:100%;
background-color:black;
position:absolute;
opacity:0.5;
bottom:0;
color:white;
}
 Suivre le flux RSS des articles de cette rubrique

|
|
|
|